
Ray tracing transforms games into jaw-dropping visual masterpieces—but only if your PC can handle it. Stuttering, crashing, or abysmal FPS ruining your experience? You’re not alone. The good news? You don’t need a $2,000 GPU to enjoy smooth RT gameplay. With the right tweaks, even mid-range rigs can optimize gaming PC without sacrificing performance. Here’s how to optimize gaming PC for RT with benchmarked results for NVIDIA.
What if we told you a 10-minute setting change could boost FPS by 50%? Or that your GPU’s hidden control panel holds the key to silky-smooth ray tracing? This guide reveals proven tricks—from driver hacks to in-game secrets—that most gamers never discover. Ready to unlock RT’s full potential? Let’s dive in!
Understanding the Beast: Why Ray Tracing Demands So Much
Before diving into optimization, it helps to understand why ray tracing hits your hardware so hard. Traditional lighting in games uses clever tricks and approximations. Ray tracing, however, simulates the actual physical behavior of light. It calculates how millions of virtual light rays bounce, reflect, and interact with surfaces in the scene. This creates unparalleled realism but requires immense computational power.
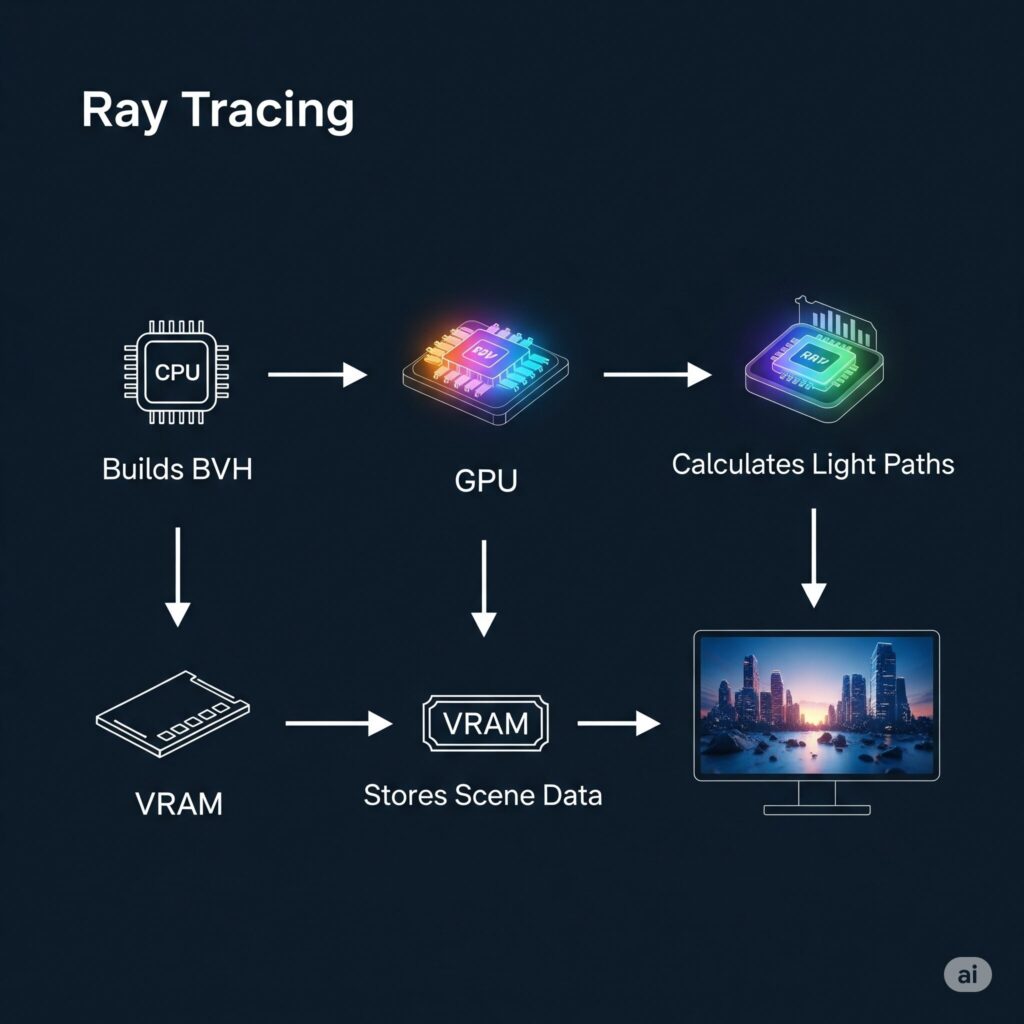
- The GPU Burden: Your graphics card, especially its dedicated RT cores (on NVIDIA) or Ray Accelerators (on AMD), shoulders the primary load of tracing these rays. The more complex the lighting effects (Global Illumination, Reflections, Shadows, Ambient Occlusion), the heavier the hit.
- The CPU’s Role: While the GPU does the heavy ray lifting, the CPU is crucial for building the scene’s structure (using Bounding Volume Hierarchies – BVH) that the rays interact with. A weak CPU can bottleneck your powerful GPU, especially impacting minimum FPS and causing stutters.
- VRAM Hunger: High-resolution textures combined with the data needed for complex ray tracing effects can quickly fill up your GPU’s video memory (VRAM). Running out of VRAM leads to severe stuttering as data is swapped to slower system RAM.
- Bandwidth Matters: Shuffling all this complex lighting data between the GPU, CPU, and memory requires fast pathways. PCIe bandwidth and memory speed play supporting roles.
Gearing Up: Hardware Essentials for Ray Tracing (Beyond Just the GPU)
Yes, the graphics card is the undisputed star, but other components play critical supporting roles. Here’s a breakdown for different performance tiers:
The Graphics Card (GPU): Your Ray Tracing Workhorse
- The Reality: You need a dedicated RT-capable GPU. While older GTX cards (like the 1660 Super or 1080 Ti) technically support basic DXR 1.1, the performance is usually unplayable with RT enabled. Aim for NVIDIA RTX 20-series or newer, or AMD RX 6000-series or newer.
- Tiered Recommendations:
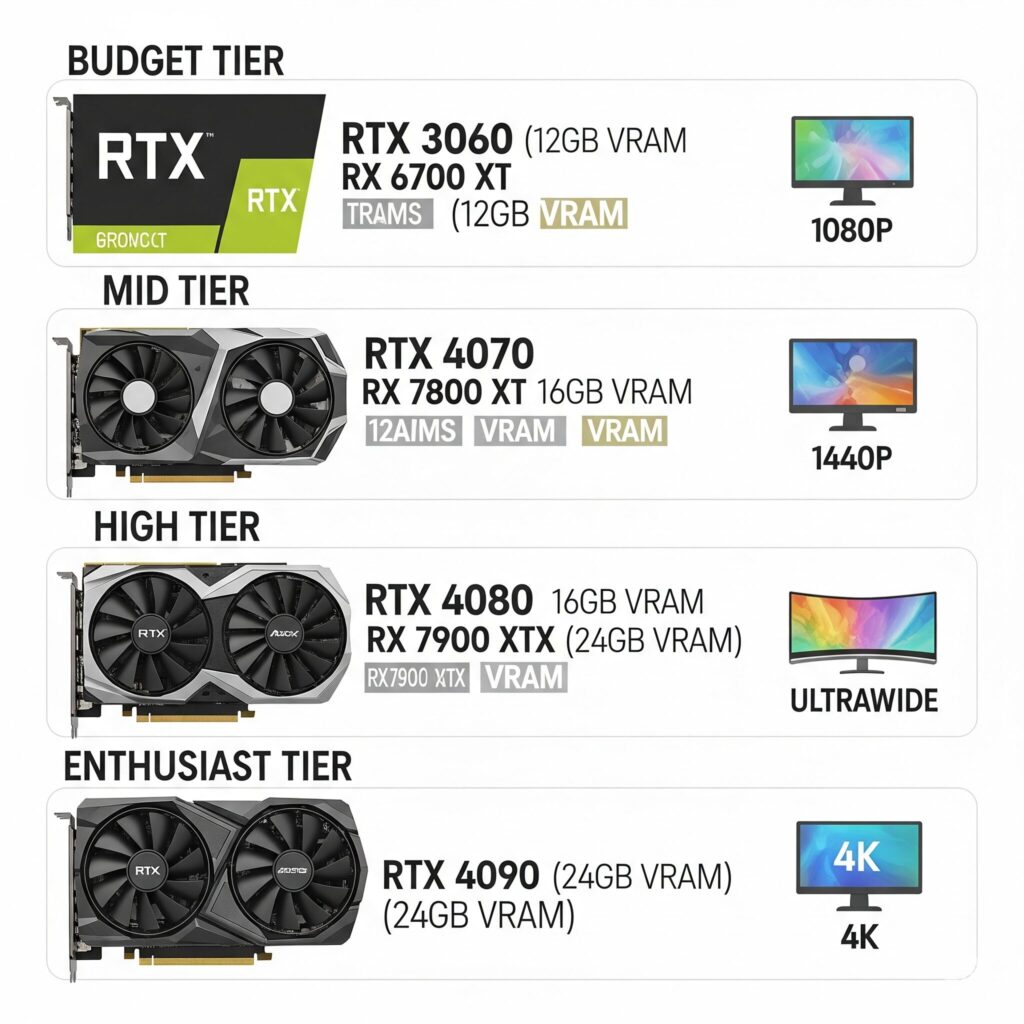
Budget (1080p / 60+ FPS, Med-High RT): RTX 3060 (12GB VRAM is a plus!), AMD RX 6700 XT. Focus on DLSS/FSR and medium RT settings.Mid-Range (1440p / 60-100+ FPS, High RT): RTX 4070 / RTX 4070 Super, AMD RX 7800 XT. Excellent balance of performance and price for high RT settings using upscaling.High-End (1440p Ultrawide / 4K / 100+ FPS, High-Ultra RT): RTX 4080 / RTX 4080 Super, AMD RX 7900 XTX. Tackles demanding RT at higher resolutions more comfortably.Enthusiast (4K / 120+ FPS, Ultra/Path Tracing): RTX 4090. The undisputed king for maxing out ray tracing, including demanding path tracing modes.- VRAM is CRITICAL: Don’t underestimate this! Ray tracing plus high-res textures consumes VRAM aggressively. Recommendations:
1080p: 8GB Minimum, 12GB Ideal.1440p: 12GB Strongly Recommended, 16GB Ideal.4K / Future-Proofing: 16GB+ Highly Recommended.- NVIDIA vs. AMD: NVIDIA generally holds a lead in pure ray tracing performance and features like advanced DLSS (Frame Generation). AMD offers excellent value and strong rasterization, with FSR 3 catching up. Choose based on your budget and desired RT level.
CPU: Avoiding the Bottleneck
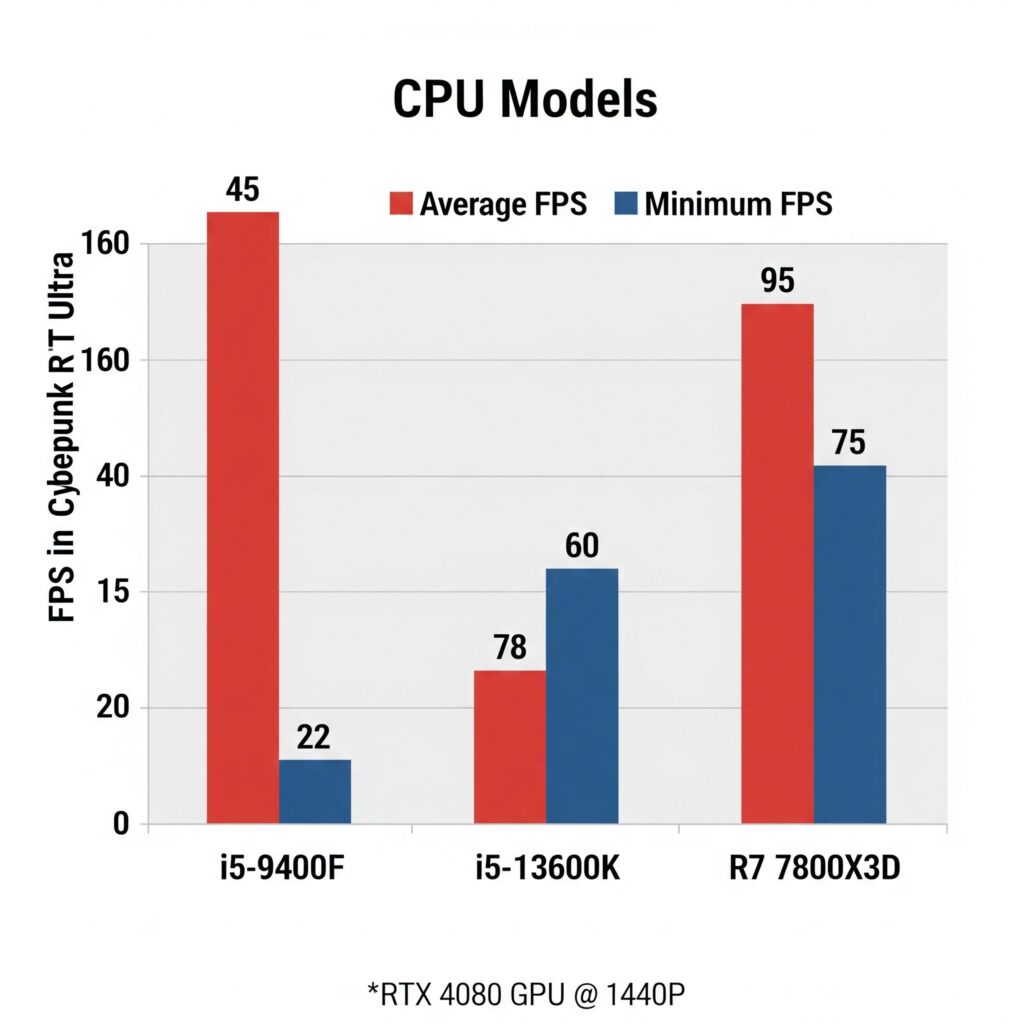
- You don’t necessarily need the absolute top-tier chip, but a weak CPU will hold back your shiny GPU, especially in CPU-intensive games or complex RT scenes affecting minimum FPS (stutters!).
- Tiered Pairings:
Budget GPU (RTX 3060/RX 6700 XT): AMD Ryzen 5 5600/5600X, Intel Core i5-12400F/13400F.Mid-Range GPU (RTX 4070/RX 7800 XT): AMD Ryzen 5 7600/X, Ryzen 7 7700/X, Intel Core i5-13600K/KF, i7-13700/F.High-End/Enthusiast GPU (RTX 4080+/RX 7900 XTX): AMD Ryzen 7 7800X3D (gaming king), Ryzen 9 7900X/7950X, Intel Core i7-14700K/KF, i9-14900K/KF.- Focus: Strong single-core performance is key for gaming. Core count (6+ cores) helps with modern titles and background tasks.
RAM: Speed & Capacity
- Capacity: 16GB is the absolute minimum for modern gaming. 32GB is strongly recommended for ray tracing titles, especially at higher resolutions or if you multitask (discord, browser, etc.). Running out of system RAM also causes major stuttering.
- Speed: Faster RAM (DDR4 3200MHz+, DDR5 5600MHz+) provides tangible benefits, particularly for minimum FPS and reducing hitches. Ensure your XMP (Intel) or DOCP/EXPO (AMD) profile is enabled in the BIOS!
Storage: Eliminating Stutters
- A fast NVMe SSD is non-negotiable. Ray tracing can increase asset streaming demands. A slow HDD will cause texture pop-in and stuttering during complex scenes. Aim for PCIe 3.0 or 4.0 NVMe drives.
Cooling: Keeping the Throttle at Bay
- Both CPUs and GPUs will boost higher and sustain performance longer if kept cool. Modern high-end GPUs especially generate significant heat when pushing RT. Ensure good case airflow (intake and exhaust fans) and consider aftermarket coolers for CPUs or GPUs if temperatures are consistently hitting the 80s (Celsius) under load. Thermal throttling = lost FPS.
Preparing the Battlefield: Essential System-Wide Optimizations
Your hardware is ready, but Windows and drivers need tuning! These steps are often overlooked but provide significant free performance gains.
Update EVERYTHING
GPU Drivers: Download the latest Game Ready or Adrenalin Edition drivers directly from NVIDIA or AMD. Crucially, perform a CLEAN install: Use tools like Display Driver Uninstaller (DDU) in Safe Mode to wipe old drivers completely before installing new ones. This prevents countless weird issues.
Motherboard BIOS: Check your motherboard manufacturer’s site for updates. Newer BIOS versions can improve memory compatibility, stability, and enable key features like…
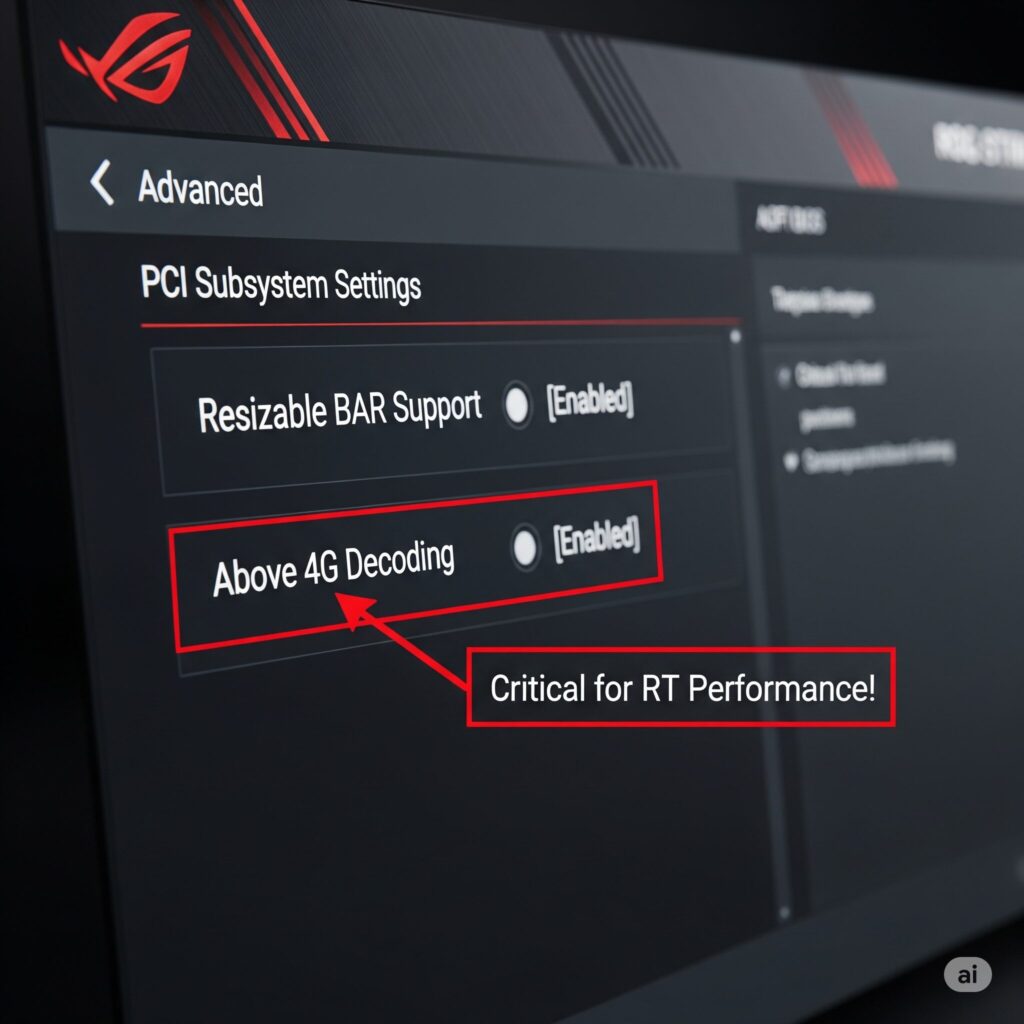
Enable Resizable BAR (NVIDIA) / Smart Access Memory (AMD)
- This feature allows your CPU to access the entire GPU frame buffer (VRAM) at once, rather than in small chunks, reducing overhead and boosting performance, especially in CPU-limited scenarios common with RT. Enable it in your BIOS! (Consult your motherboard manual). Also ensure it’s enabled in your GPU control panel (it usually is by default if BIOS is set).
Tame the Windows Beast
- Game Mode: Settings > Gaming > Game Mode > Turn On. Helps prioritize resources for your game.
- Power Plan: Search for “Choose a power plan” > Select Ultimate Performance (if available) or High Performance. Prevents your CPU/GPU from downclocking unnecessarily.
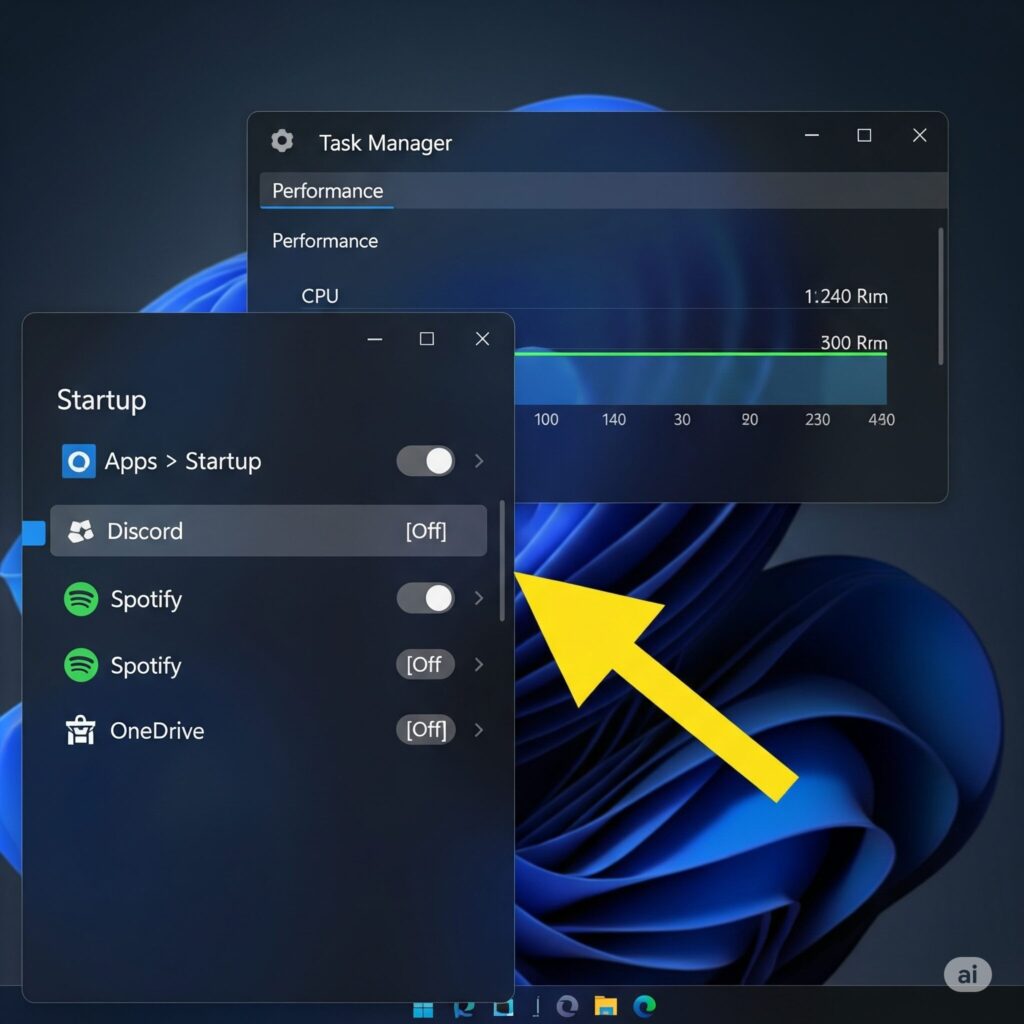
- Background Apps: Settings > Apps > Startup > Disable everything non-essential (cloud storage, updaters, chat apps you don’t need while gaming). Also, check Task Manager (Ctrl+Shift+Esc) > Startup Apps tab. Fewer background tasks mean more resources for your game.
- Hardware-Accelerated GPU Scheduling (HAGS): Settings > System > Display > Graphics Settings > Toggle Hardware-accelerated GPU scheduling On or Off. Test this per game! It can sometimes boost performance, sometimes hurt it, or cause instability. Toggle and benchmark.
- Game Bar & Recording: If you don’t use them, consider disabling Game Bar (Settings > Gaming) and Background Recording to save resources.
Master Your GPU Control Panel: (Where the magic really happens!)
NVIDIA Control Panel (Right-click desktop)
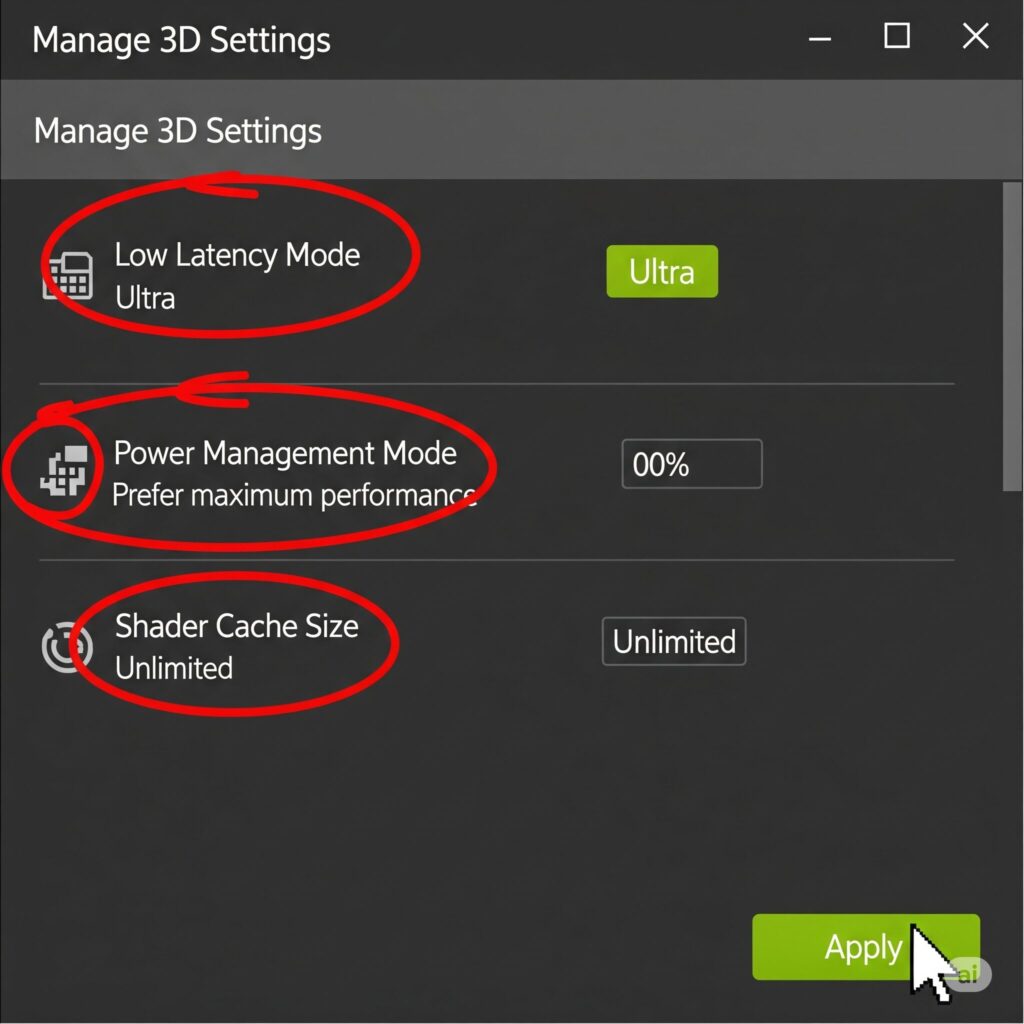
- Manage 3D Settings > Global Settings (or Program Settings for per-game tweaks):
- Low Latency Mode: Set to Ultra. Reduces input lag.
- Power Management Mode: Prefer Maximum Performance.
- Texture Filtering – Quality: Set to High Performance. Minimal visual impact, small gain.
- Shader Cache Size: Set to Unlimited (or 10GB+ if Unlimited isn’t an option). Reduces stuttering from shader compilation.
- Vertical sync: Set to Off (Control V-Sync in-game instead).
- Optional but Potentially Helpful: Threaded Optimization On, DSR Factors Off (unless using), Monitor Tech G-Sync Compatible if applicable.
AMD Adrenalin Software
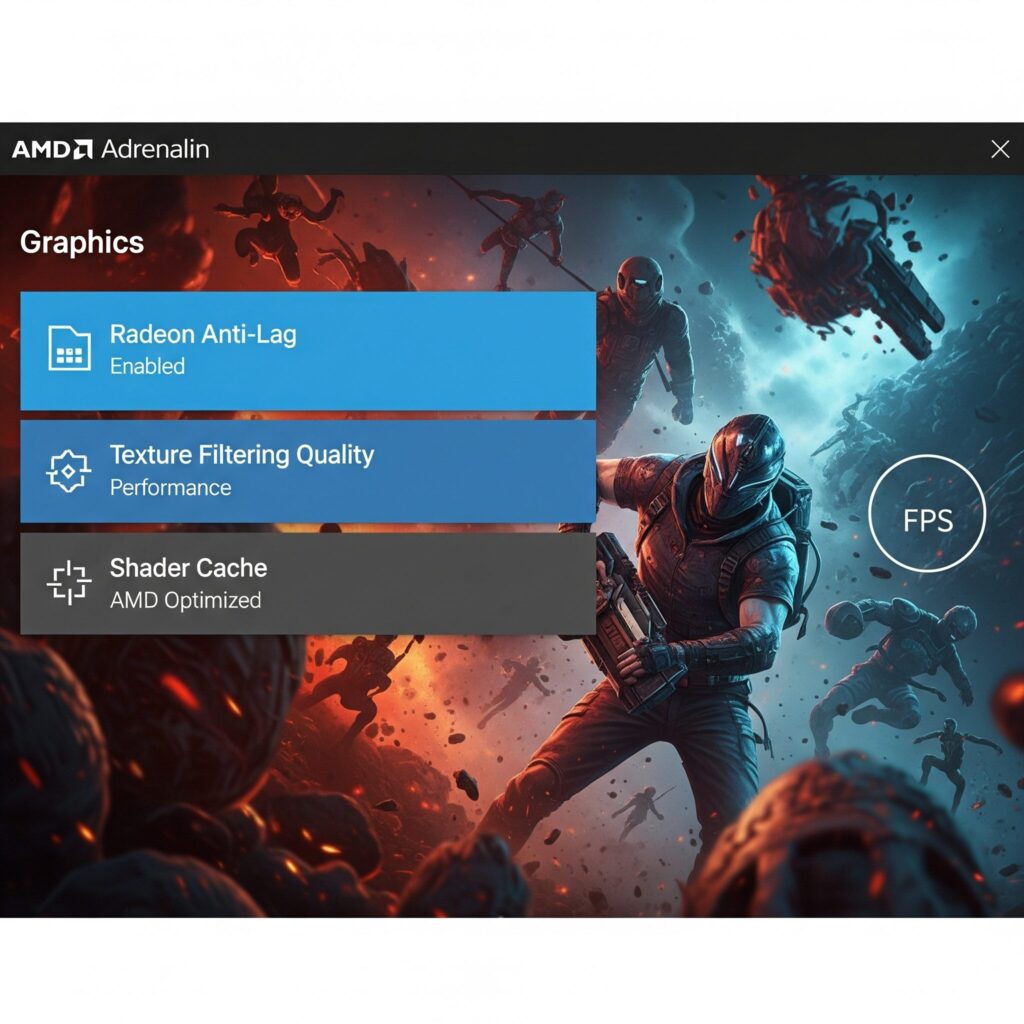
- Graphics > Global Graphics (or Game Graphics for per-game):
- Radeon Anti-Lag: Enabled. Reduces input lag.
- Radeon Boost: Disabled (can cause visual artifacts).
- Texture Filtering Quality: Performance.
- Wait for Vertical Refresh: Always Off, unless application specifies.
- Shader Cache: AMD Optimized or Enabled.
- GPU Workload: Graphics.
- Advanced:
- Surface Format Optimization: Enabled.
- Tessellation Mode: AMD Optimized.
- OpenGL Triple Buffering: Off.
Conquering the Game: In-Game Settings Demystified & Optimized
Now we get to the heart of it! Launch your game, head to the graphics menu, and take a deep breath. Remember the golden rule: Change ONE setting at a time and test! Use the game’s built-in benchmark or tools like MSI Afterburner/RivaTuner to monitor FPS.
Resolution & Upscaling: Your Biggest FPS Levers
- Native Resolution: Looks sharpest but is the most demanding. Often the first sacrifice for RT.
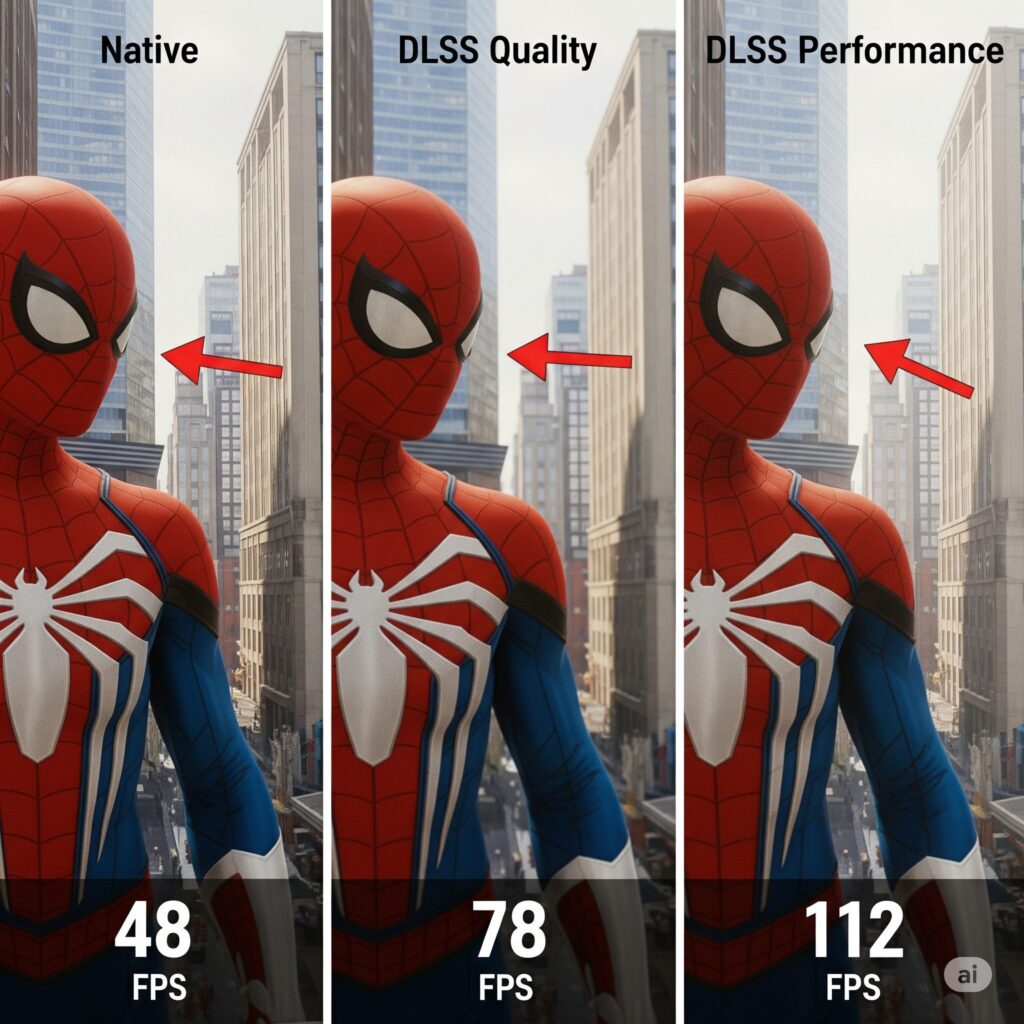
- DLSS (NVIDIA) / FSR (AMD/All) / XeSS (Intel/All): These are GAME CHANGERS for ray tracing. They render the game at a lower resolution (e.g., 1440p on a 4K display) and use intelligent upscaling (or AI for DLSS/XeSS) to reconstruct a near-native quality image with a massive FPS boost.
- Modes: Quality (Best Image, Smallest Boost) > Balanced > Performance (Softest Image, Biggest Boost) > Ultra Performance (Use Sparingly). Start with Quality or Balanced.
- Which to choose? If you have an RTX GPU, DLSS (especially DLSS 3 with Frame Generation on 40-series) is usually the best. FSR 3 (with Frame Generation) and XeSS are excellent cross-platform alternatives. Enable this FIRST before touching RT settings!
- DLSS (NVIDIA) / FSR (AMD/All) / XeSS (Intel/All): These are GAME CHANGERS for ray tracing. They render the game at a lower resolution (e.g., 1440p on a 4K display) and use intelligent upscaling (or AI for DLSS/XeSS) to reconstruct a near-native quality image with a massive FPS boost.
Ray Tracing Settings: Taming the Light
- Global RT Preset (Low/Medium/High/Ultra): The easiest starting point. Begin with Medium or High. Ultra often has diminishing visual returns for a huge cost.
- Individual RT Effects: This is where the real optimization happens. Effects vary wildly in cost between games. Prioritize based on impact and cost:
- Reflections: Often the most noticeable and usually less expensive than others. Great bang for buck. (Med/High).
- Shadows: Can add depth but sometimes subtle. Cost varies. (Med/High).
- Ambient Occlusion (RT AO): Enhances contact shadows. Can be impactful but costly. (Med, sometimes Off if traditional SSAO/HBAO+ looks decent).
- Global Illumination (RT GI): Transforms scene lighting, creating realistic bounced light. Often the MOST DEMANDING effect. The visual leap is huge, but so is the FPS hit. (Low/Med for balance, High/Ultra if you have headroom).
- Lighting Quality/Particle Effects: Game specific. Test impact.
- RT Lighting Range/Resolution: Some games offer sliders. Reducing range or resolution can claw back significant FPS with sometimes minor visual degradation. Experiment!
- Individual RT Effects: This is where the real optimization happens. Effects vary wildly in cost between games. Prioritize based on impact and cost:
Traditional Settings: Freeing Up Resources for RT
- Dialing these back frees up GPU power for ray tracing. Focus on high-impact settings first:
- Shadow Quality (Non-RT): High Impact. Set to Medium or High. Avoid Ultra.
- Volumetric Fog/Lighting: High Impact. Medium is often sufficient. Can be very costly on Ultra.
- Ambient Occlusion (Non-RT SSAO/HBAO+): Medium-High Impact. Set to SSAO or Medium HBAO+. Often replaced by RT AO anyway.
- View Distance/Level of Detail (LOD): Medium Impact. High is usually fine. Ultra rarely adds much visible detail at distance.
- Texture Quality: Keep this at High or Ultra IF you have enough VRAM. Running out of VRAM causes bad stutters. If FPS dips occur in complex scenes, try lowering one notch. Don’t sacrifice textures first for RT.
- Anti-Aliasing: Medium-Low Impact. Lower this if using DLSS/FSR/XeSS, as they have built-in AA. TAA is common but can be blurry; see if FSR 2/3 or DLSS looks sharper. MSAA/SSAA are very expensive – avoid with RT.
- Post-Processing (Motion Blur, Depth of Field, Bloom, Lens Flare): Low Impact / Preference. Disable Motion Blur and Depth of Field for competitive clarity, or keep for cinematic feel. Minimal FPS cost.
For the Enthusiasts: Advanced Tweaks for Every Last Frame
Got the basics dialed but crave more? These techniques require more effort but offer rewarding gains:
Undervolting Your GPU: The Secret Weapon
- What it is: Reducing the voltage supplied to your GPU core at a given clock speed. This lowers power consumption, heat, and fan noise, allowing your GPU to potentially sustain higher boost clocks for longer without thermal throttling. It does NOT void your warranty and is generally safe when done carefully!
- The Tool: MSI Afterburner (works for all GPUs).
- The Process (Simplified):
- Open MSI Afterburner, unlock Voltage Control in settings.
- Run a stress test (e.g., FurMark) to find stock stability.
- Slowly lower the core voltage curve point corresponding to your typical boost frequency (e.g., 1950MHz) by small increments (e.g., -25mV). Apply.
- Test stability extensively with demanding games or benchmarks (Cyberpunk RT Overdrive is great). If crashes, increase voltage slightly or lower target frequency slightly.
- Find the lowest stable voltage for your desired performance level. Enjoy lower temps, quieter fans, and potentially more consistent RT performance!
- Caution: Take it slow. Every GPU is different (“silicon lottery”). Stability test thoroughly!
RAM Timing Tweaks (Beyond XMP/DOCP)
- If you’re comfortable in the BIOS, manually tightening primary timings (CL, tRCD, tRP, tRAS) or adjusting subtimings can yield minor but free FPS gains, particularly improving minimum FPS. Requires extensive stability testing (MemTest86, OCCT). Only recommended for enthusiasts.
Monitoring is Key
- Use MSI Afterburner + RivaTuner Statistics Server (RTSS) to overlay critical metrics in-game:
- FPS & Frametimes (smoothness)
- GPU Usage, Clock Speed, Temperature
- CPU Usage (per core if possible), Temperature
- VRAM Usage
- RAM Usage

- This tells you exactly what’s limiting performance (GPU? CPU? VRAM?) and helps validate your settings changes. Is your GPU at 99%? Great, it’s the bottleneck. Is it at 70% while CPU cores are maxed? CPU bottleneck.
Game-Specific Nuances
- Optimization varies! Research settings for your favorite RT-heavy games. For example:
- Cyberpunk 2077: “Cascaded Shadows Resolution” is very heavy. “Volumetric Fog Resolution” too. “RT Lighting” is the main GI cost.
- Alan Wake 2: Mesh Shaders are crucial. RT Reflections are key. Path Tracing mode is extremely demanding.
- Fortnite: Lumen Global Illumination (Software vs. Hardware RT) offers different performance tiers. Nanite Virtualized Geometry also impacts performance. Adjust settings based on target FPS (competitive vs. visual).
Troubleshooting: When Ray Tracing Goes Wrong
Even with optimization, issues can pop up:
- Stuttering:
- Shader Compilation Stutter: Most common on first launch/after updates. Let the game cache compile fully (play through initial areas). Ensure Shader Cache is enabled in GPU control panel.
- VRAM Stutter: Monitor VRAM usage. If it’s maxed out, lower Texture Quality or RT settings/resolution. Symptoms: Severe, consistent hitches.
- Background App Stutter: Double-check background processes. Disable overlays (Discord, Steam, etc.) temporarily to test.
- Crashes:
- Driver Issues: Try a clean reinstall with DDU. Roll back to a previous stable driver if the latest causes problems.
- Unstable Undervolt/Overclock: Revert to stock GPU/CPU/RAM settings to test.
- Overheating: Monitor temps. Clean dust, improve airflow, or reduce power limits/undervolt further.
- Game Bugs: Check patch notes, forums. Verify game files (Steam/Epic/etc.).
- Visual Artifacts (Flickering, Strange Lights):
- Driver Issues: Clean reinstall.
- Failing Hardware: Test with other games/stress tests. Monitor for GPU artifacts.
- Unstable OC/UV: Revert to stock.
- Severely Low FPS:
- Major Bottleneck: Check GPU/CPU usage. Is one significantly below 99% while the other is maxed? Upgrade the bottleneck.
- Settings Too High: Especially RT Global Illumination or Ultra presets. Dial back.
- Resizable BAR/SAM Disabled: Check BIOS and GPU control panel.
- HAGS Causing Issues: Try disabling it.
Gazing into the Crystal Ball: Future-Proofing Your RT Experience
Ray tracing tech is evolving rapidly. Here’s what’s on the horizon:
- DLSS 3 / FSR 3 Frame Generation: Already here on newer GPUs! This tech inserts AI-generated frames between rendered ones, massively boosting perceived FPS, especially crucial for demanding RT/Path Tracing. Expect wider adoption and refinement.
- Path Tracing: The “holy grail” – simulating all light paths, not just key ones. Currently extremely demanding (Cyberpunk Overdrive Mode), but offers unparalleled realism. Requires next-gen hardware and upscaling/FG.
- DLSS 4 / FSR 4: Expect even better image quality, efficiency, and potentially new features like resolution-independent upscaling. Continued AI advancements will be key to making advanced RT accessible.
- Unreal Engine 5 Lumen & Nanite: These core engine technologies are built with scalability for RT/GI and complex geometry. Future games using UE5 will leverage RT more efficiently but also push boundaries.
- Next-Gen GPUs: Expect significantly improved RT performance per dollar, more VRAM as standard, and hardware dedicated to accelerating path tracing and future upscaling techniques.
Appendix: Optimize Gaming PC for RT Cheat Sheet
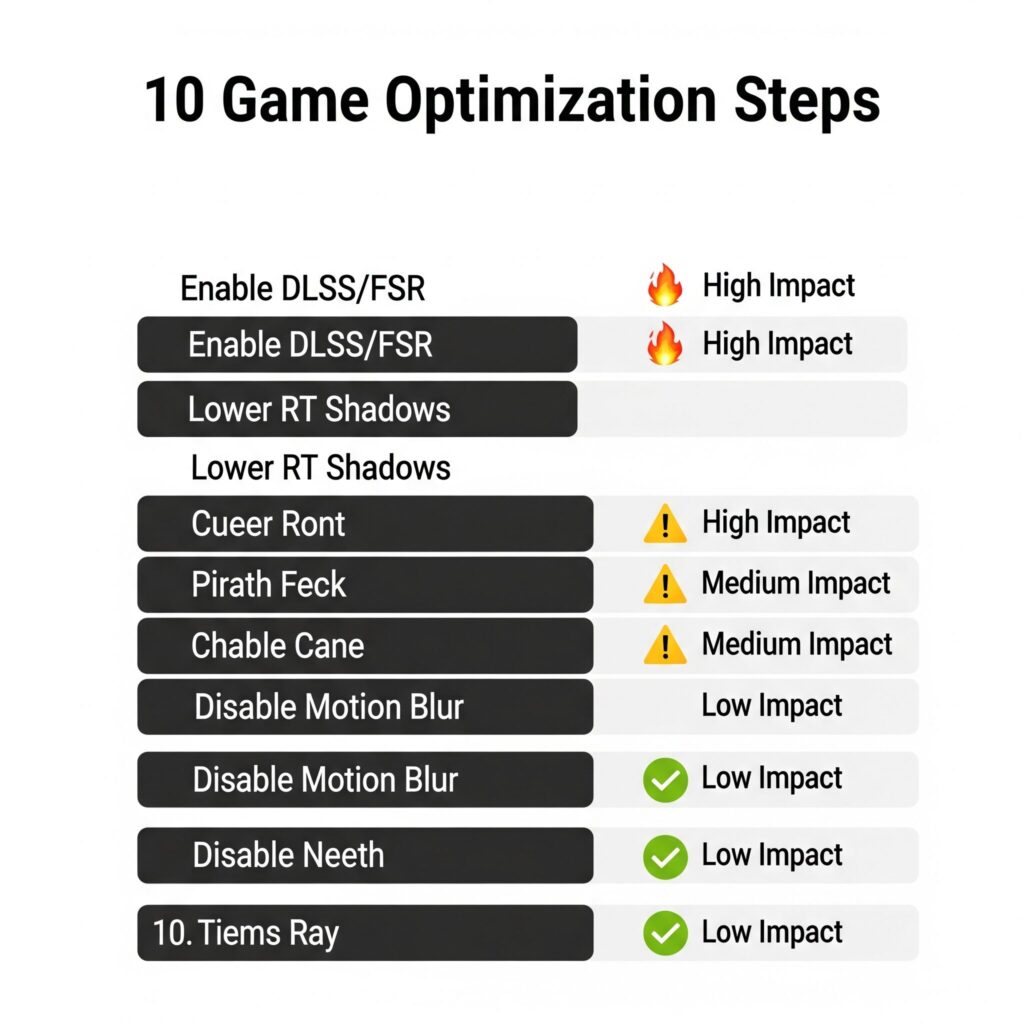
| Optimization Action | Expected Impact | Quick Instructions |
| Enable DLSS/FSR/XeSS | HIGH | Set to Quality/Balanced mode first. Biggest FPS boost! |
| Lower RT Global Preset | HIGH | Start at Medium/High. Drop to Low if struggling. |
| Disable RT Global Illum. | HIGH | The single heaviest RT effect. Turn off if FPS is critical. |
| Lower Non-RT Shadows | HIGH | Set Shadows to Medium/High. Avoid Ultra. |
| Lower Volumetric Fog | HIGH-MED | Set to Medium. Often high cost for subtle effect. |
| Clean GPU Driver Install | MED-HIGH | Use DDU in Safe Mode before installing latest drivers. Prevents many issues. |
| Enable Resizable BAR/SAM | MED | Enable in BIOS & ensure active in GPU software. Helps CPU-limited scenarios. |
| Set GPU Power to Max Perf | MED | NVIDIA CP: “Prefer Max Perf”. AMD: “GPU Workload: Graphics”. |
| Set Low Latency Mode | MED (Feel) | NVIDIA: “Ultra”. AMD: “Anti-Lag: On”. Reduces input delay. |
| Increase Shader Cache | MED (Stutters) | NVIDIA: “Unlimited”. AMD: “AMD Optimized/Enabled”. Reduces shader comp stutter. |
| Undervolt GPU (Advanced) | MED (Temps/Noise) | Lower voltage for same clock speed. Reduces heat, noise, may boost sustained clocks. |
| Disable Background Apps | MED-LOW | Free up CPU/RAM resources via Task Manager > Startup & Settings > Apps > Startup. |
| Use High Perf Power Plan | LOW-MED | Windows Settings > System > Power & Battery > Power Mode: “Best Performance”. |
Essential Tools
- Monitoring: MSI Afterburner + RivaTuner Statistics Server (RTSS)
- Driver Cleanup: Display Driver Uninstaller (DDU)
- Stability Testing: OCCT, FurMark, MemTest86, Cinebench R23
- FPS Measurement: Built-in game benchmarks, CapFrameX, FRAPS (legacy)
Glossary
- RT: Ray Tracing
- GI: Global Illumination
- DLSS: Deep Learning Super Sampling (NVIDIA AI Upscaling)
- FSR: FidelityFX Super Resolution (AMD Open Upscaling)
- XeSS: Xe Super Sampling (Intel AI Upscaling)
- FG: Frame Generation (DLSS 3 / FSR 3)
- HAGS: Hardware-Accelerated GPU Scheduling
- Resizable BAR / SAM: Technology allowing CPU full access to GPU VRAM
- BVH: Bounding Volume Hierarchy (Data structure for ray tracing)
- Undervolting: Reducing GPU voltage for efficiency
- LOD: Level of Detail
- TAA: Temporal Anti-Aliasing
Conclusion: Your Path to Optimize Gaming PC for RT
Optimizing for ray tracing isn’t about just maxing out sliders. It’s a journey of balancing artistry with performance. By understanding the demands, strategically choosing hardware, meticulously tuning your system and in-game settings, and even employing advanced techniques like undervolting, you can transform your ray tracing experience from a choppy slideshow into a fluid, visually spectacular masterpiece.
Remember the key takeaways:
- GPU is King, but VRAM is Critical: Choose wisely for your target resolution and RT level. Don’t skimp on VRAM!
- Upscaling is Essential: DLSS, FSR, XeSS are your best friends for reclaiming FPS lost to RT. Enable them first!
- Not All RT Effects are Equal: Prioritize reflections and dial back Global Illumination if needed. Tweak individual settings.
- System Tweaks Matter: Clean driver installs, Resizable BAR, background app management, and GPU control panel settings provide free performance.
- Monitor and Test: Use tools to see your bottlenecks and validate every change. Find your perfect balance.
- Embrace the Future: Frame Generation and evolving upscalers are key to enjoying next-gen RT effects like Path Tracing.
Now go forth! Apply these steps, experiment fearlessly (but test methodically!), and finally enjoy those stunning ray-traced worlds the way they were meant to be experienced: smoothly and spectacularly. Happy gaming!
Frequently Asked Questions (FAQs)
Can I use ray tracing with a GTX card (like a GTX 1080 Ti or 1660 Super)?
Technically, yes, some GTX cards support basic DXR Tier 1.1. But realistically? Performance is almost always unplayably low (think sub-30 FPS at 1080p with minimal settings). For a genuinely enjoyable ray tracing experience, you really need an RTX 20-series (or newer) or AMD RX 6000-series (or newer) GPU. The dedicated hardware cores make all the difference.
Is ray tracing even worth the performance hit?
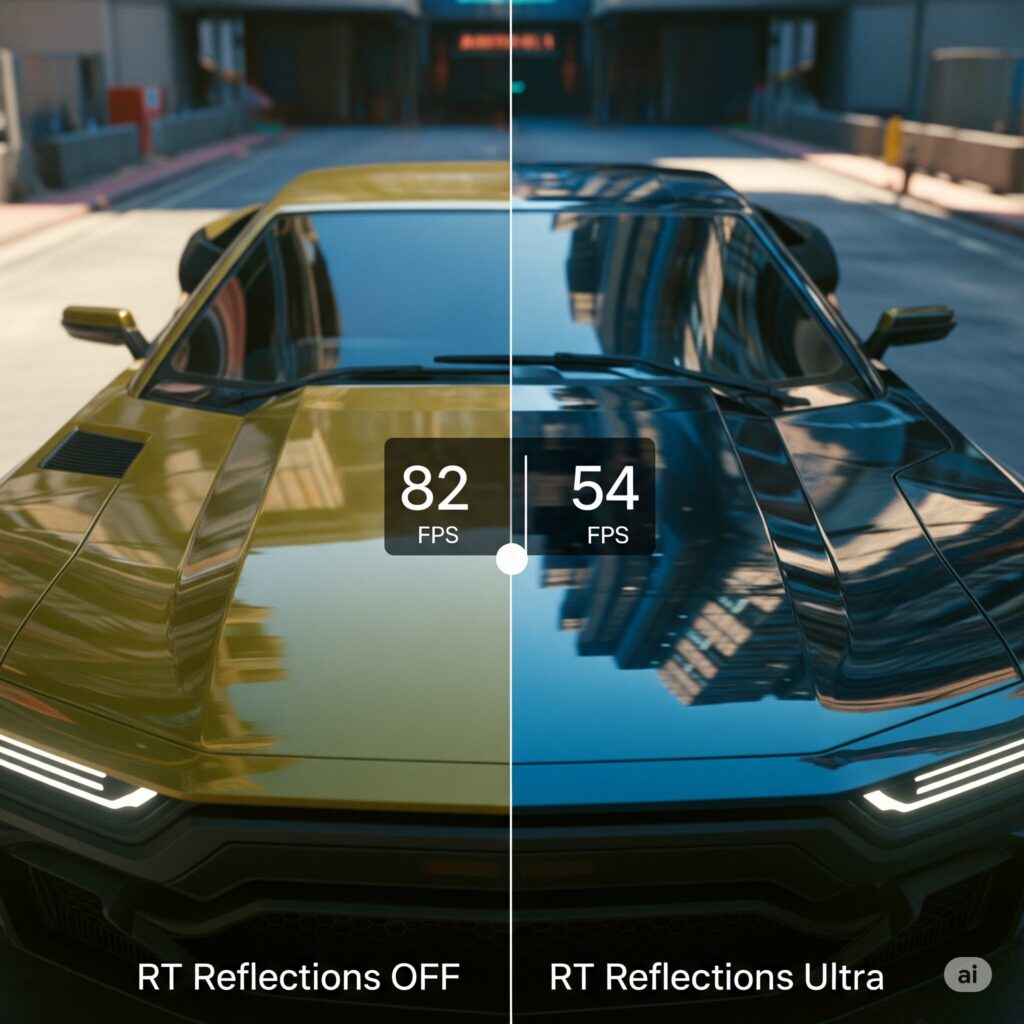
That’s the million-dollar question, and it depends! The visual impact varies massively between games and specific effects. Realistic reflections in puddles or on cars? Often transformative and worth a moderate hit. Subtle shadow improvements? Maybe less so. Full path tracing lighting like in Cyberpunk 2077 Overdrive? Stunning, but demands top-tier hardware. Use our guide to find your balance – sometimes medium RT settings offer 80% of the visual wow for half the performance cost of Ultra. The comparison images in our intro highlight why many find it worthwhile!
Do I need a super expensive CPU for ray tracing?
Not necessarily the most expensive, but you can’t ignore it. While the GPU does the heavy lifting, a weak CPU will bottleneck it, especially affecting your minimum FPS and causing annoying stutters. Pairing an RTX 4080 with an old Core i5 from 5 generations ago is a bad idea. Aim for a solid modern mid-range chip (like a Ryzen 5 7600X or Core i5-13600K) or better, as we recommended in the hardware section, to keep things smooth.
How much VRAM do I really need for ray tracing?
More than you probably think! Ray tracing effects themselves consume significant VRAM, on top of the high-resolution textures modern games use. We recommend:
1080p: 8GB absolute minimum, but 12GB is much more comfortable for current and near-future games.
1440p: 12GB is strongly recommended, 16GB is ideal.
4K / Future-Proofing: 16GB or more is highly recommended.
Running out of VRAM causes severe stuttering, so err on the side of more!
Should I use DLSS/FSR even if I’m not using ray tracing?
Absolutely! DLSS, FSR, and XeSS are fantastic performance boosters regardless of ray tracing. They render the game at a lower resolution and intelligently upscale it, often providing image quality very close to native resolution while giving you significantly higher FPS. It’s free performance! Always give Quality or Balanced modes a try first.
Why do I get way worse ray tracing performance in Game X compared to Game Y?
Ray tracing implementation is not created equal! Some games use only one or two simpler effects (like reflections), while others push the envelope with multiple effects or even full path tracing (like Cyberpunk 2077’s Overdrive Mode). The game engine, how well it’s optimized for RT, and the complexity of the effects used all dramatically impact performance. Always check optimization guides for specific demanding titles.
Is undervaluing safe? Will it void my warranty?
Undervaluing is generally considered very safe when done carefully. You’re reducing the voltage supplied to the GPU core, which actually lowers heat and power consumption – potentially even extending the card’s lifespan! It does not void your warranty with major manufacturers like NVIDIA, AMD, ASUS, MSI, Gigabyte, etc., as long as you don’t physically modify the card. Just follow our guide (or others) step-by-step and test thoroughly for stability. If unsure, you can skip it.
What’s the single biggest FPS boost for ray tracing?
Hands down, enabling DLSS, FSR, or XeSS upscaling provides the most significant immediate FPS gain, often doubling performance or more. After that, lowering the Ray Tracing Global Preset (e.g., from Ultra to High) or disabling the most demanding individual RT effect (usually Global Illumination) will yield the next biggest returns. Check out the Cheat Sheet in the Appendix for a quick reference on high-impact actions!
READ MORE ARTICLES
How Do I Get TikTok Back on My iPhone in 2025?
How to Know If Someone Blocked You on iMessage
How to Optimize Gaming Laptop for VR: Complete 2025 Guide
How to Unpair Apple Watch: Complete Guide [2025 Updated]
Top AI Tools of 2025: Your Friendly Guide to Smarter Work & Play
Finally boost my fps successfully
how i build my gaming pc under $5000?