
Ever had that moment where you look at your Facebook profile and think, “That name doesn’t feel like me anymore”? Maybe you’ve recently gotten married, undergone a personal or professional rebranding, or perhaps you’re just tired of the name you chose back in college.
Changing your name on Facebook should be simple, but navigating the settings can sometimes feel like a maze. From our experience, users often get stuck trying to find the right menu, understanding the rules, or figuring out what to do when things go wrong.
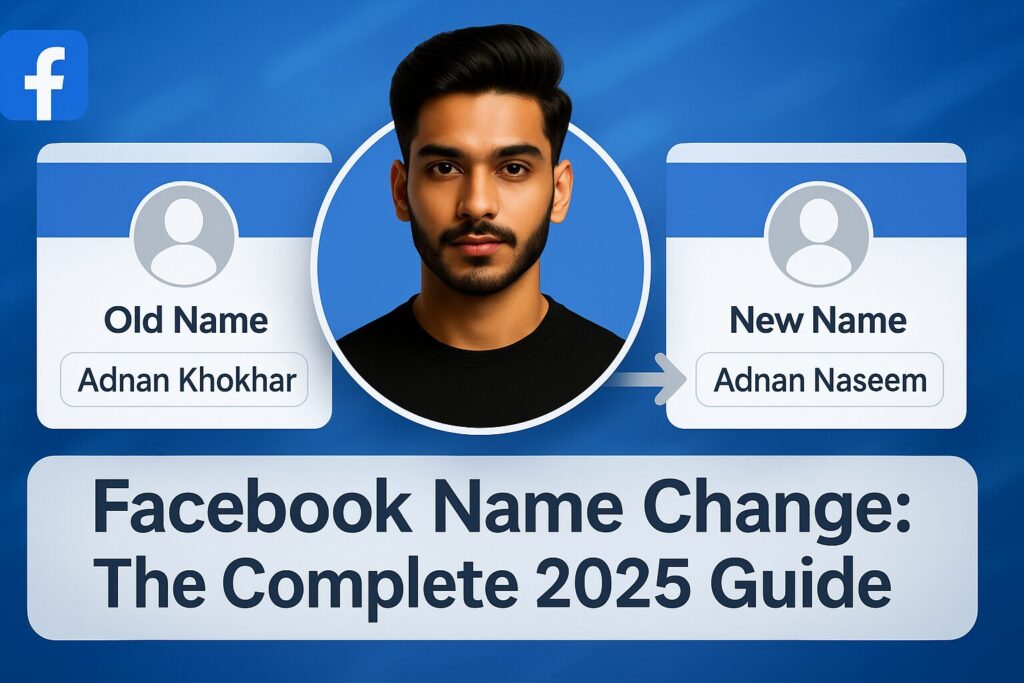
That’s where this guide comes in. We’re going to walk you through every single step of the process in a clear, friendly way. We’ll cover changing your name on your personal profile, your business Page, and even your username. More importantly, we’ll cover the crucial rules and troubleshooting tips that most other guides forget.
In a Hurry? The Quick Answer for Changing Your Name
We get it, sometimes you just want the solution without the fluff. For those who want the express lane, here is the fastest way to change your Facebook name.
| Make sure you are logged into your Facebook account. |
| Your profile will be displayed. Click on your name. |
| Enter your new first, middle (optional), and last name in the respective fields. |
| Click the blue “Review Change” button. |
| A pop-up will show you a preview. Choose by yourself how to be displayed your name and click “Save Changes.” |
The Step-by-Step Guide to Changing Your Facebook Profile Name
Facebook’s interface can look slightly different depending on whether you’re using a phone or a computer. We’ll break down the process for each platform with detailed instructions.
Method 1: Using the Facebook Mobile App (for iPhone and Android)
This is the most common way people access Facebook, and changing your name only takes a minute.
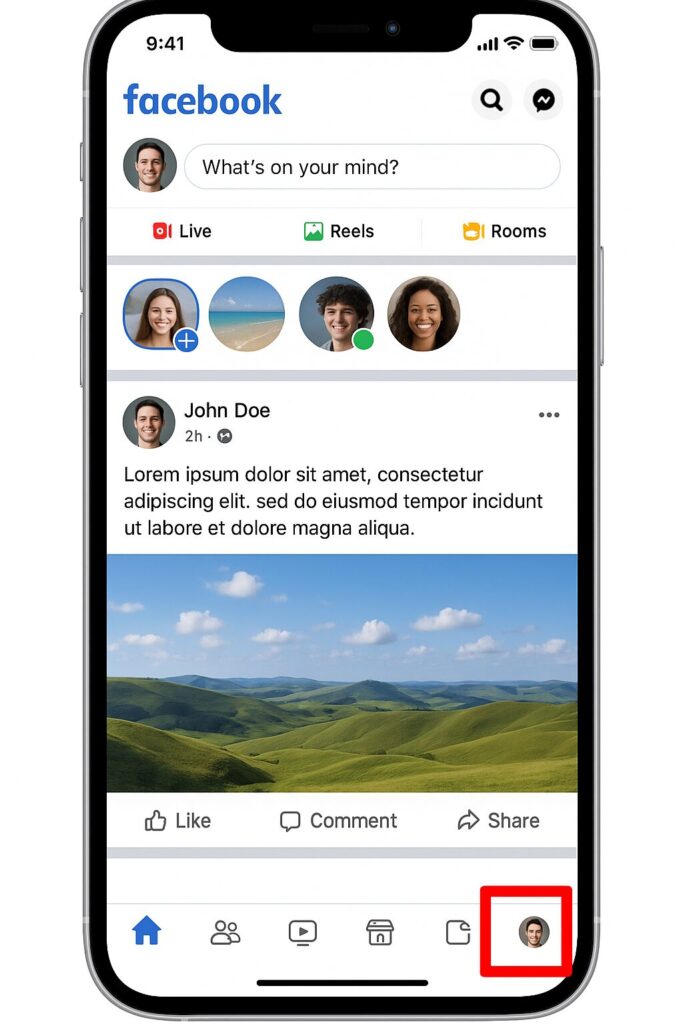
Step 1: Open the Menu Launch the Facebook app. Look for the menu icon, which is your profile picture and three horizontal lines, typically located in the bottom-right corner (for iPhone) or top-right corner (for Android). Tap on it.
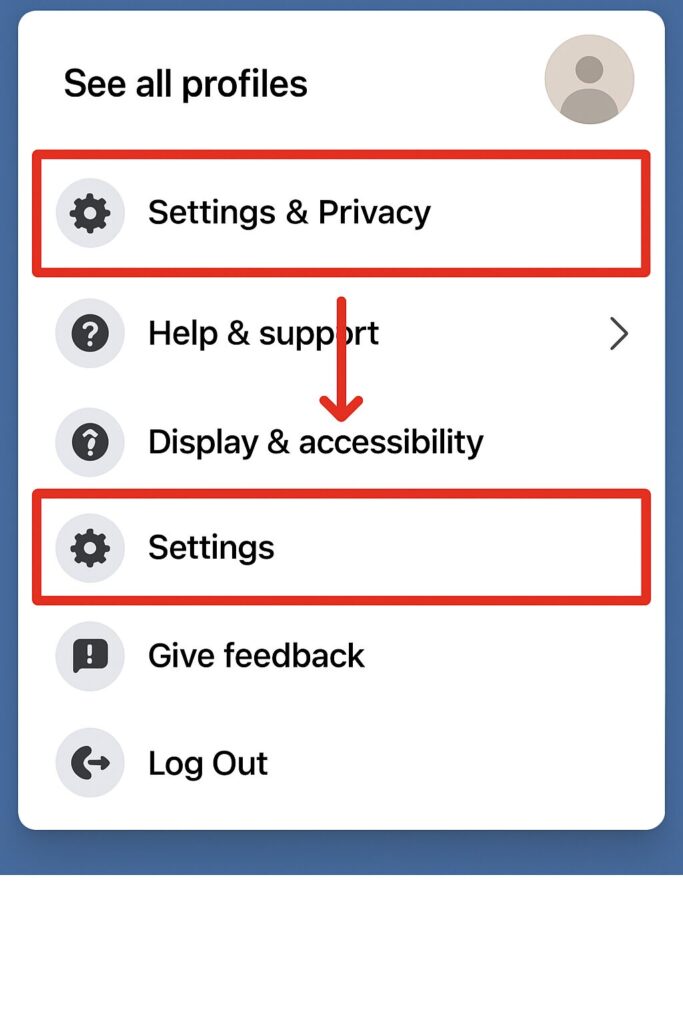
Step 2: Navigate to Settings Scroll down the menu page until you see “Settings & Privacy.” Tap on it, and a dropdown will appear. From that dropdown, tap on “Settings.”

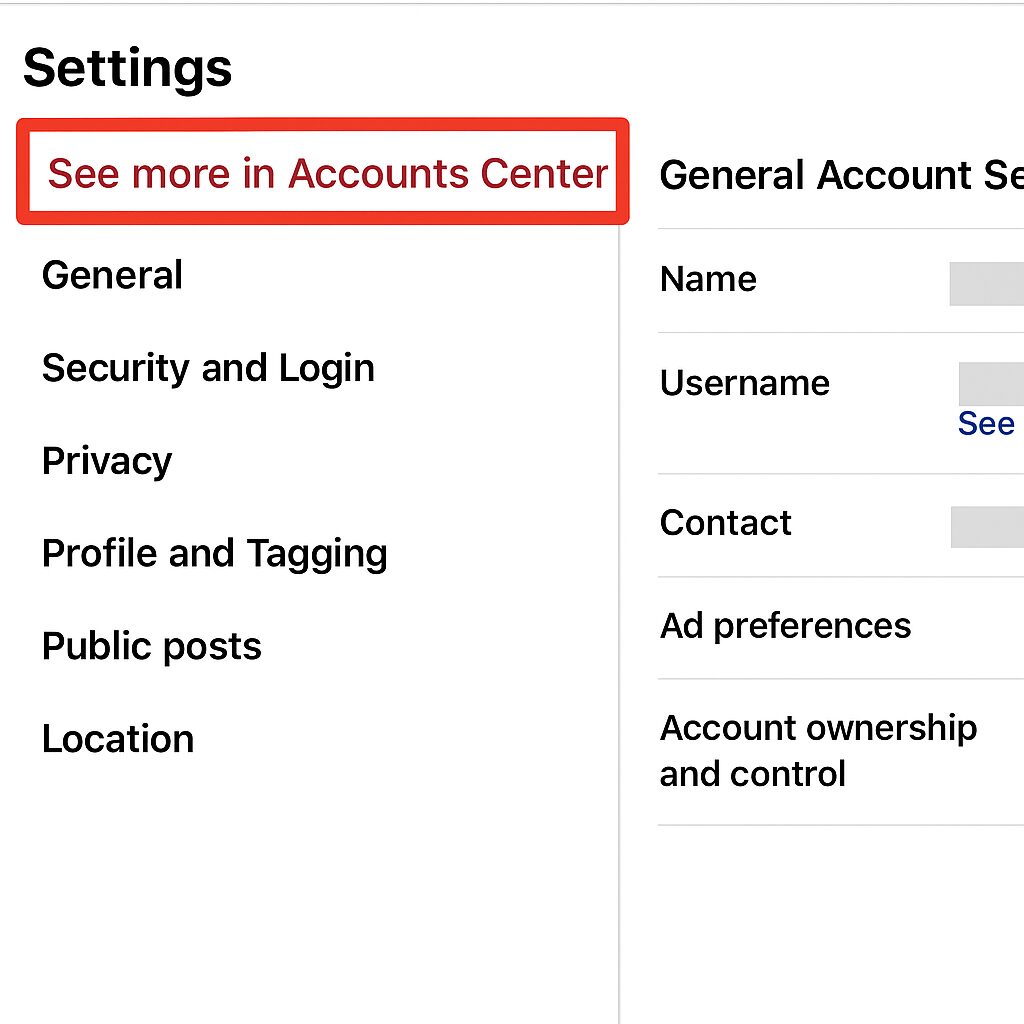
Step 3: Enter the Accounts Center Facebook has recently consolidated all its account settings into a new area called the “Accounts Center.” This is the most important step. At the top of the Settings, you’ll see a blue box. Tap on “See more in Accounts Center.”

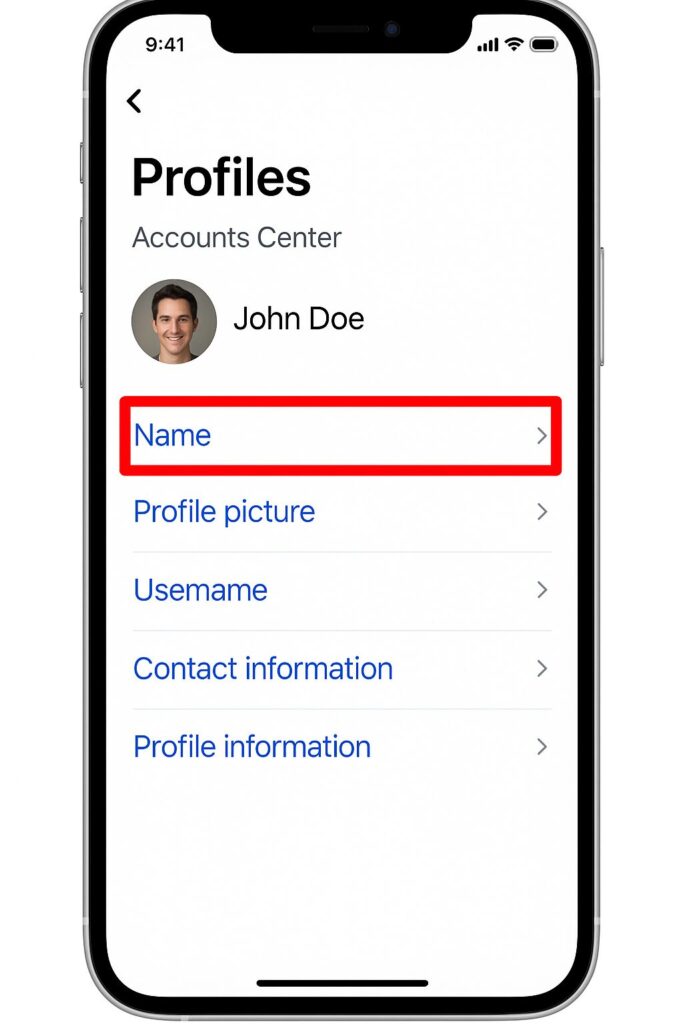
Step 4: Select Your Profile Inside the Accounts Center, you’ll see your connected profiles (including Instagram if it’s linked). Tap on the “Profiles” section at the top, which shows your profile picture and name.
Step 5: Access the Name Settings On the next screen, tap on your Facebook profile again. This will take you to a menu where you can edit your Name, Username, Profile Picture, or Avatar. Tap on “Name.”
Step 6: Enter Your New Name and Save You’ve made it to the final screen! Here, you will see fields for your first, middle, and last name. Type in your desired new name.
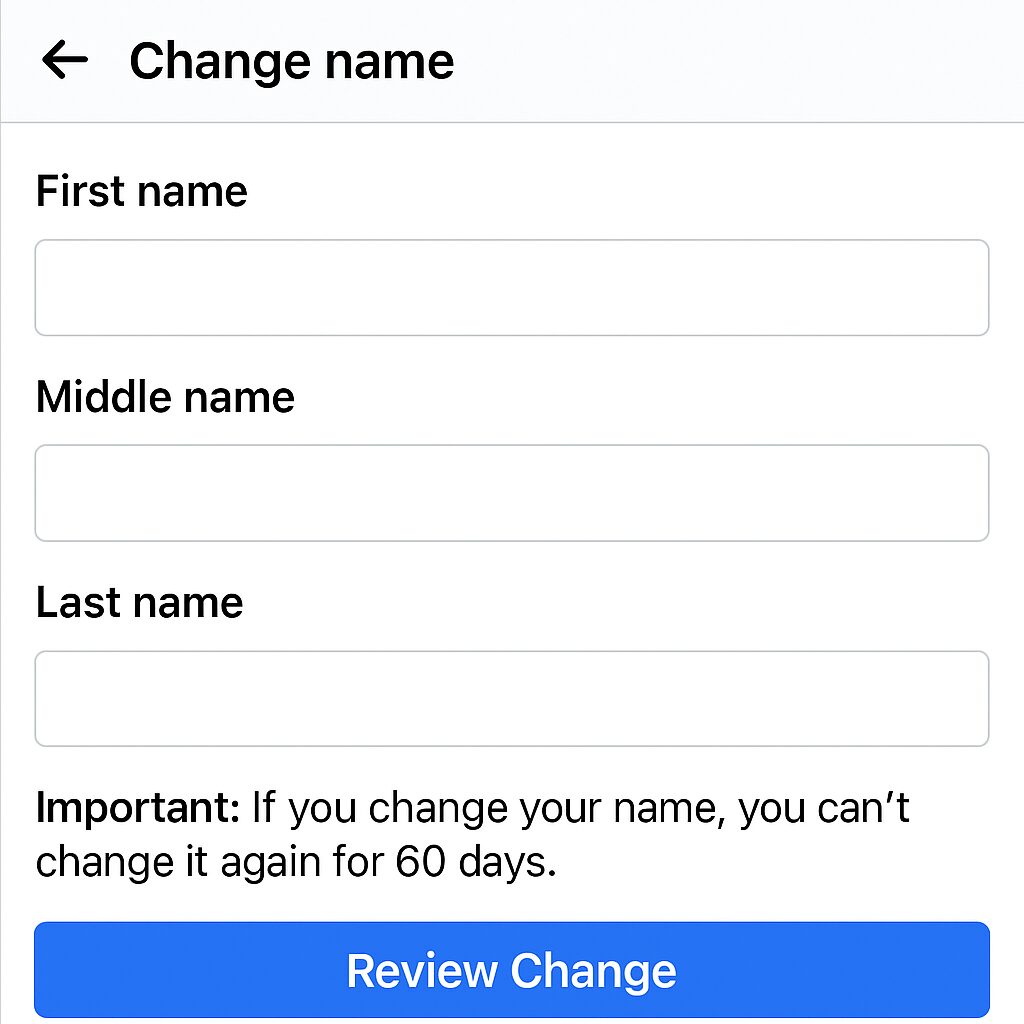
- Important Note: As Facebook will remind you, you can only change your name once every 60 days. Double-check for any typos before proceeding.
- Once you are think it’s good, click “Review Change.”
- Facebook will show you a preview of your new name (e.g., “John Smith” or “Smith, John”). Select the display order you prefer and hit the “Save Changes” button.
Your name on Facebook should now be updated across the platform!
Method 2: Using a Desktop Computer (Website)
If you prefer using Facebook on a laptop or desktop, the process is just as straightforward.
Step 1: Open the Main Menu Go to Facebook.com and log in. In the top-right corner of the screen, click on your profile picture. This will open a dropdown menu.
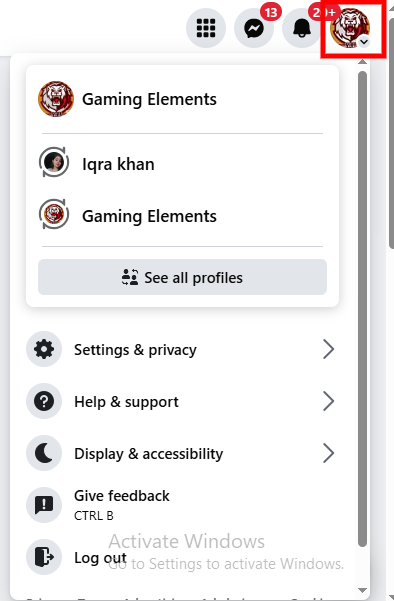
Step 2: Go to Settings From the dropdown menu, click on “Settings & Privacy,” and then click on “Settings” from the subsequent menu that appears.
Step 3: Open the Accounts Center Just like on mobile, all the core settings are now in the Accounts Center. On the left- side of the Settings, you’ll see a menu. Click on “See more in Accounts Center.”
Step 4: Navigate to Your Name This will open the main Accounts Center dashboard. From here, the steps are identical to the mobile version:
- Click on “Profiles” at the top.
- Select your Facebook profile.
- Click on “Name.”
Step 5: Change Your Name and Save In the provided fields, type your new first, middle, and last name. Remember the 60-day rule! After you’ve checked for spelling errors, click the blue “Review Change” button, select your preferred display format, and click “Save Changes.”
Method 3: For Facebook Lite Users
For those using the data-friendly Facebook Lite app, the steps are slightly different as it uses an older interface.
- Open the Facebook Lite app.
- Tap the three horizontal lines menu icon in the top-right corner.
- Scroll down and tap on “Settings.”
- Under the “Account” section, tap on “Personal and account information.”
- Next to “Name,” tap on “Edit.”
- Enter your new name, and tap “Review Change.”
Beyond Your Profile Name: Other Important Changes
Changing your display name is just one piece of the puzzle. Your online identity on Facebook also includes your Page name (if you have one), your unique username, and any nicknames.
How to Change Your Facebook Page Name
Changing the name of a Facebook Page (for a business, brand, or community) is a different process and has its own set of rules. A frequent point of confusion for users is trying to find the Page settings within their personal profile’s Accounts Center—it’s not there!
To change a Page name, you must be an Admin of the Page.
On Desktop (Easiest Method):
| Go to your Facebook Page. |
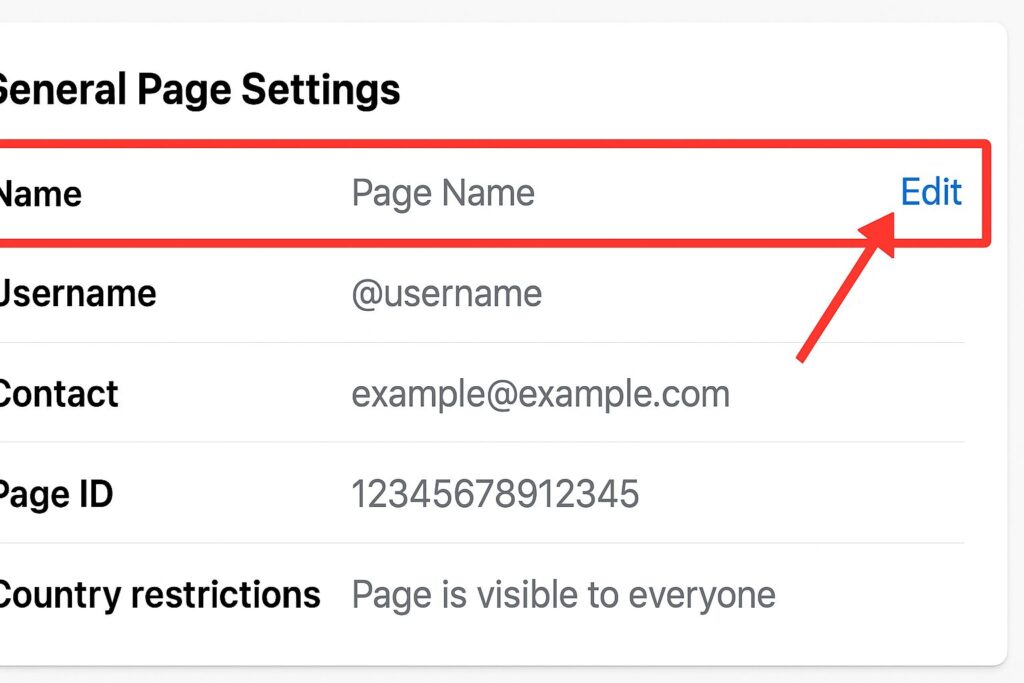
| On the left-hand menu of your Page, scroll down and click “Settings.” |
| In the “General” tab that opens, you will see your Page name. Click the “Edit” link next to it. |
| Enter your new Page name and click “Request Change.” |
Important Notes for Page Name Changes:
| Facebook will review your request, which can take up to three days. |
| Changing a Page name can affect your Page’s username (@handle). |
| Your new name must not be misleading and must accurately reflect the Page’s topic. |
How to Change Your Facebook Username (Your Custom URL)
Your username is the unique address for your profile, also known as your “vanity URL.” It’s what appears after facebook.com/ (e.g., facebook.com/john.smith123). It’s different from your display name.
On Desktop:
| Go to the main “Settings” page (click your profile picture > Settings & Privacy > Settings). |
| If you’re in the old settings view, you should see “Username” as the second option. Click “Edit.” |
| If you’re in the new Accounts Center view, go there, click your profile, and then select “Username.” |
| Enter your desired new username. Facebook will tell you if it’s available. |
| If it’s available, click “Save Changes.” |
How You Can Add or Change a Nickname or Another Name
You can add a secondary name to your profile, like a maiden name, a professional title, or a nickname. This name will appear in parentheses next to your main profile name.
| Go to the Accounts Center Name Settings (the same place you change your main name). |
| Below the name fields, click on “Manage other names.” |
| Here, you can select a “Name type” (e.g., Nickname, Maiden Name) and enter the name. |
| You can also check a box to “Show at top of profile.” |
The Rules of the Road & Troubleshooting
This is where many users get stuck. Understanding Facebook’s rules can save you a lot of headaches. From our experience, these are the most critical issues people face.
The Golden Rule: The 60-Day Limit
We’ve mentioned it before, but it’s the most important rule: You can only change your profile name once every 60 days. There are no exceptions to this rule, so always double-check for spelling mistakes before you confirm the change.
Facebook’s Name Standards: What You CAN and CAN’T Use
Facebook has a “real name” policy. While it’s not always strictly enforced, your name change will be rejected if it violates their standards. Your name CANNOT include:
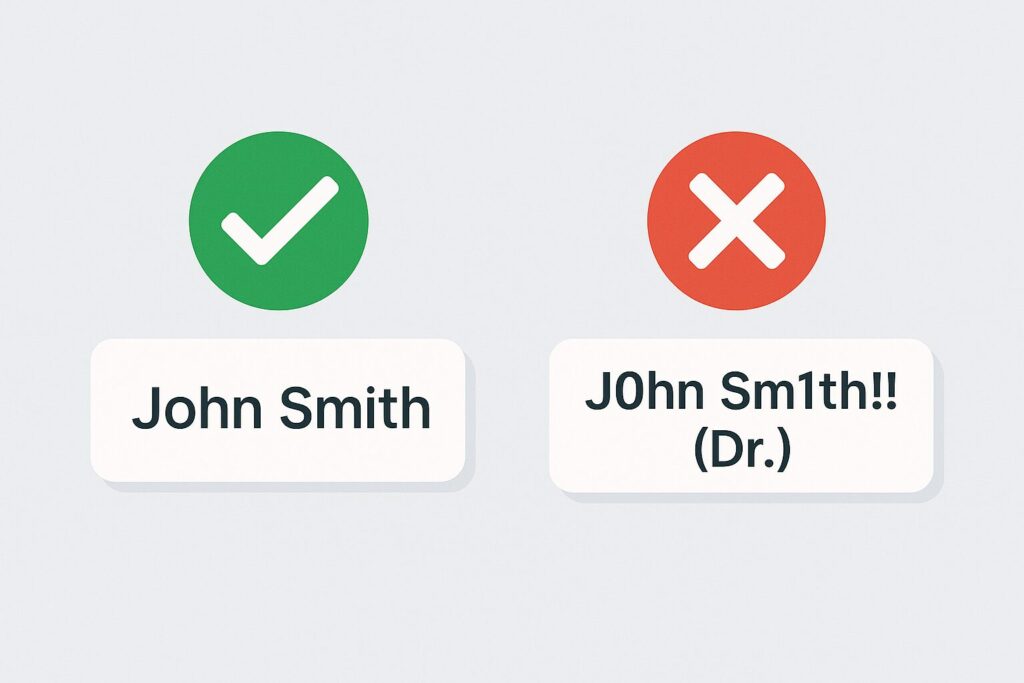
- Symbols, numbers, or unusual capitalization: No J0hn Sm1th or jOhN sMiTh.
- Characters from multiple languages: You can’t mix Cyrillic and Latin characters, for example.
- Titles of any kind: No “Dr. John Smith,” “John Smith Esq.,” or “Sir John Smith.”
- Words or phrases instead of a name: Your name can’t be “Loves to Bake” or “The Best at Football.”
- Offensive or suggestive words.
Why Can’t I Change My Name? – Common Problems & Solutions
If the option to change your name is grayed out or you get an error, it’s likely due to one of these reasons:
- You changed your name in the last 60 days.
- Solution: Unfortunately, the only solution is to wait for the 60-day period to end.
- You have changed your name too frequently in the past.
- Solution: Facebook may place a temporary block if it detects suspicious activity. You may need to wait longer than 60 days or contact support.
- Your requested name violates the Name Standards.
- Solution: Review the rules above and try a different variation of your name that complies with the policy.
- You were previously asked to verify your name on Facebook.
- Solution: If you’ve already gone through a verification process, you may not be able to change it again. You’ll need to contact Facebook support directly.
Denied a name change? Follow these steps
If you submit a name change and Facebook rejects it, but you believe it complies with their policies (for example, it’s your legal name), you can appeal the decision.
Facebook will typically send you a notification. Within that notification or on their help pages, you may find a link to a form to “learn more” or “request a review.” You may be asked to submit a copy of a government-issued ID (like a driver’s license or passport) to prove that the name you are requesting is your authentic name.
Conclusion
Changing your name on Facebook is a straightforward process once you know where to look. By using the new Accounts Center, you can update your personal details for both your computer and phone in just a few clicks.
The key is to remember the rules—especially the 60-day limit—and to ensure your desired name complies with Facebook’s standards. By following this guide, you should have all the information you need to successfully update your identity on the platform.
If you have any other questions or ran into an issue we didn’t cover, feel free to leave a comment below!
Frequently Asked Questions (FAQ)
How many times can I change my Facebook name?
There is no official limit to the total number of times you can change your name over the lifetime of your account. However, you are strictly limited to one name change per 60-day period.
Can I use a single name on Facebook (like “Cher” or “Madonna”)?
Generally, Facebook requires both a first and last name. However, in some cultures (like in parts of Indonesia), a single name is common. If this applies to you, you can fill out a special request form on Facebook’s Help Center to ask for an exception. You may need to provide proof of your cultural background or identity.
Will changing my Facebook name also change my Messenger name?
Yes. Your Facebook name and your Messenger name are tied together. When you update your name on Facebook, it will automatically update in Messenger as well.
How long does it take for a name change to be approved?
For most profile name changes, the update is instant. For Facebook Page name changes, the review process can take up to three days or sometimes longer.
What if I made a mistake in my name and the 60 days aren’t over?
Officially, you must wait 60 days. However, in very rare cases, if you immediately realize you made a typo, you might be able to revert to your previous name. Go back to the Name settings page, and you may see an option to “Use previous name” for up to 48 hours. This option is not always available.
Related Article
How to Clear Instagram Cache: Fix Glitches, Free Up Space
How to Delete or Deactivate Your Facebook Account – Complete Guide